So Ubuntu 15.10 has been released and is time to find out what you can add to make your Ubuntu experience even better. It doesn’t matter if you are have a fresh install of Ubuntu 15.10 or just upgraded from Ubuntu 15.04 to Ubuntu 15.10 version, these tips will help you add some flavor to your Ubuntu install. So let’s begin, shall we?
1. Check for Updates
No surprises here. Even though you might have just installed Ubuntu 15.10, you will surely want to have all your packages updated to their latest stable version.
This should provide better stability and in some cases performance of your system. To check for new updates, you can start the “Software Update” application. For that purpose simply click the Unity button and type “Software update“:
The software will automatically check for newly released updates and install them automatically as shown.
Checking Software Updates
Installing Software Updates
Alternatively, you can start a terminal application and run the following command:
$ sudo apt-get update
Installing Updates from Commandline
2. Look and Feel
Ubuntu hasn’t change its outlook in quite some time now (few years if I’m correct). The ambiance and radiancetheme are not looking bad at all, but they look somehow old compared to other operating systems. But let’s not forget that Linux is flexible and it can be customized. You can change the appearance of your Ubuntu by using the “System Settings” -> Appearance.
Here you can select:
- Different Desktop wallpaper
- Choose different theme (quite limited at first, but you can install more)
- Change the icon size of Unity
3. Install Unity Tweak Tool
If the “Appearance” menu is not providing enough settings for you, you may add some additional tweaking features by installing Unity Tweak Tool. It can be easily installed from the Ubuntu Software Center. Simply type “Unity tweak tool” and install it:
Unity Tweak Tool allows you to greatly customize Unity’s settings including – autohide, icons theme, panel settings, behavior, switcher and many many others. It’s fair to say that you can play with this tool for hours until you finally decide which settings are the best.
4. Install Graphics Drivers
Using the proper drivers for your graphics card is important cause you can get better experience on your system, without the laggy movement of different windows. Not only that, but you can also
play games on your Ubuntu Linux system which will require the proper drivers to be installed.
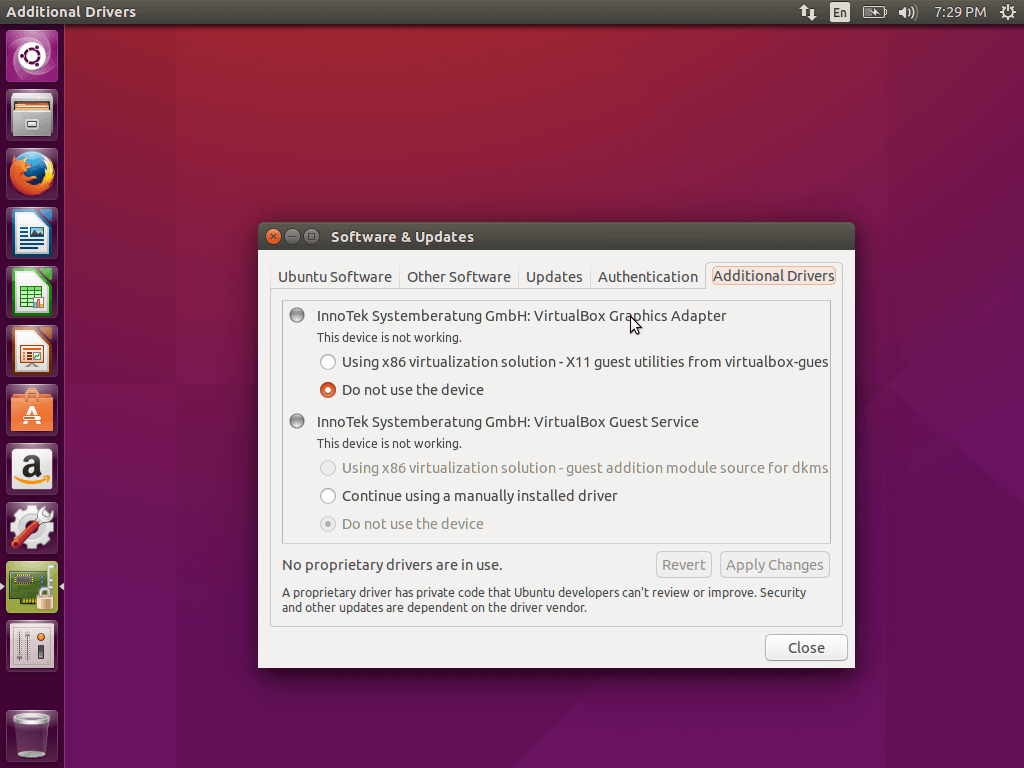
To install your graphic drivers, simply start the Unity dash and type “Additional Drivers” and click on the icon. A new window will appear which will automatically search the proper drivers:

Install Graphic Drivers
When found, choose the appropriate version and install it.
5. Install Media Codecs
Media is great part of the desktop experience. Whether is for listening music or watching movies, installing media codecs is a must! Due to some patent issues, the codecs are not included in the default Ubuntu install.
You can however choose to install them upon Ubuntu install. In case you have missed that, you can easily install them from
here or you can directly install from ‘
Ubuntu Software Center‘.

Install Ubuntu Restricted Extras
6. Install GIMP – Image Editor
GIMP is a free image manipulation software. It’s one of the best in it’s category for Linux and it’s your best friend if you need to edit an image on your Linux machine.
GIMP can easily installed either via the Ubuntu Software Center:

Install Gimp in Ubuntu 15.10
Or by simply running the following commands in a terminal:
$ sudo apt-get install gimp gimp-data gimp-plugin-registry gimp-data-extras
7. Integrate Online Account
Ubuntu supports different type of online accounts such as Facebook, Twitter, Gmail and many others. You can easily integrate them via Unity Dash -> type “Online Accounts“. In the new window you will be able to choose which accounts to configure:

Add Online Accounts in Ubuntu
8. Install Google Chrome
This is probably the first thing I do whenever I install a new operating system. Google Chrome is currently the most used web browsers and if you have not given it a change yet, I highly encourage you to do so. It’s amazingly fast, easy to use and comes with thousands of useful extensions.
To install Google Chrome simply go to the following article and download and install the .deb package that matches your OS (32-bit or 64-bit) as shown in the article.
- Install Google Chrome in Ubuntu
9. Install Synaptic Package Manager
Synaptic is a package manager that allows you to install/update/uninstall different packages as well as fix broken dependencies. And all this, with an easy to use graphical interface.
Installing Synaptic package manager is simple as:
$ sudo apt-get install synaptic

Install Synaptic Tool
When the install is complete, you will be able to find Synaptic in Unity dash -> Synaptic.

Synaptic Package Manager
10. Install some Media Applications
As mentioned earlier, Ubuntu does not come with great support for media files. This is why you can install some more apps to help you with media files:
- VLC
- Smplayer
- Audacious
- QMMP
- Mixxx
- XBMC
- Handbrake
- Openshot
All of the above can be found in the Ubuntu Software Center and can be installed with a single click.
11. Install Spotify
Spotify is probably the best alternative to iTunes right now and has millions of songs to enjoy on it. It’s a multi-platform program that can be installed on Ubuntu as well.
To complete the installation open a terminal and type the following commands:
$ sudo apt-key adv --keyserver hkp://keyserver.ubuntu.com:80 --recv-keys D2C19886
$ echo deb http://repository.spotify.com stable non-free | sudo tee /etc/apt/sources.list.d/spotify.list
$ sudo apt-get update
$ sudo apt-get install spotify-client
After installation of Spotify, when you launch you will get a following error.
$ spotify
spotify: error while loading shared libraries: libgcrypt.so.11: cannot open shared object file: No such file or directory
Its due to libgcrypt11 package is no long comes with default repositories and Spotify depends on it and will not be installed wihtout libgcrypt11 package.
To install and use
Spotify on
Ubuntu 15.10, all you have to do is to install the
libgcrypt11 deb package for your distribution from
HERE.
12. Install Archive Applications
By default Linux can easily handle
tar files, but to extend the amount of different archive files you can use on your Ubuntu system (zip, tar.gz, zip, 7zip rar etc) install the following packages by running the command below:
$ sudo apt-get install unace unrar zip unzip p7zip-full p7zip-rar sharutils rar uudeview mpack arj cabextract file-roller
13. Install Chat Applications
What’s a desktop operating system if you can’t use it for chat? There are many different chat applications for Ubuntu and here are some of the most famous ones:
- Pidgin
- Skype
- Xchat
- Telegram
- aMSN
- Viber
Most of these are easily installable from the Ubuntu Software Center. If you don’t like too much clicking, you can use these commands:
$ sudo apt-get install pidgin
$ sudo apt-get install skype
$ sudo apt-get install xchat
$ sudo apt-get install amsn
$ sudo add-apt-repository ppa:atareao/telegram -y
$ sudo apt-get update
$ sudo apt-get install telegram
To install, you will need to download and install the Viber package as shown in the following article.:
- Install Viber in Ubuntu

Install Viber in Ubuntu
14. Install a Torrent Client
Ubuntu comes with “Transmission” which is a great torrent client, but it lacks a good interface and is not that practical. Instead you can install qbittorent which has a more modern look and is much easier to use.
To install qbittorent, run the following command:
$ sudo apt-get install qbittorrent

Install qbittorrent in Ubuntu
15. Install Wine
Wine is a Windows emulator and allows you to run Windows applications on your Ubuntu system. Unfortunately not all apps are supported and some might be buggy, but at the end you will be able to do the job.
Installing wine can be performed by running:
$ sudo apt-get install wine winetricks
16. Install Steam
Steam is a multiplayer platform developed by Valve. It provides many different games on different platforms including Linux. You can choose from great variety of different games and play with friends locally or online.
To install Steam, simply go to Ubuntu Software Center and look for “Steam“:
17. Install DropBox
DropBox is a cloud storage service where you can keep your files, photos or documents. It can be easily integrated with your Ubuntu system by installing the desktop client. For that purpose simply go to the following article and follow the instruction as stated in the article to install Dropbox on your Ubuntu.
- Install Dropbox in Ubuntu
When the installation finishes, you will be able to find the application in Unity Dash -> DropBox.
18. Install Compiz
Adding some extra visual effects can be great for your Ubuntu Desktop. Compiz provides different awesome desktop effects for your desktop. The installation is fairly easy. Open a terminal and run the following command
$ sudo apt-get install compiz compizconfig-settings-manager compiz-plugins
19. Install SystemBack
Creating system backups is vital. That way you can always restore your system to an earlier working state in case of disaster. That’s why you can install tool such as SystemBack to create backup of your Ubuntu system.
To do this, run the following commands in terminal:
$ sudo add-apt-repository ppa:nemh/systemback
$ sudo apt-get update
$ sudo apt-get install systemback
20 Try different Desktop Environments
Ubuntu is not only limited to Unity. It can be used with different desktop environments such as cinnamon, mate, GNOME and others. While there are Ubuntu releases with those IDE’s pre-installed, you can try them within one Ubuntu installation.
To install cinnamon you can use the following command executed in a terminal:
$ sudo apt-get install cinnamon-desktop-environment
Installing GNOME can be completed with:
$ sudo apt-get install gnome-shell ubuntu-gnome-desktop
And finally MATE can be added with:
$ sudo apt-get install ubuntu-mate-desktop
21. Install Youtube-dl
Youtube-dl is a small command line tool that can help you download videos from YouTube. It can be easily installed via:
$ sudo apt-get install youtube-dl
An extensive guide how to install and use this tool can be found in our article
here.
22. Adjust Privacy Settings
While the Unity Dash is great for finding different things on your OS, there might be some information you may not want to see. For example weather results, wikipedia links or different amazon products. You can adjust that, by going to “System Settings” -> “Security and Privacy“.
In there you can:
- Disable online features in the Unity Dash
- Choose which folders and files appear in searches
- Turn off automatic error reporting
23. Enable extra repositories
You can add some extra repositories for even more cool stuff. For that purpose enable the “Canonical Partners” repos via Software & Updates -> Other Software.
24. Setup a Printer
To use your printer with Ubuntu, you will need to setup the printer first. This is rather easy task. Simply follow these steps:
- Make sure printer is on
- Connect the printer to your computer with the appropriate cables. You might be asked to install additional drivers if the system founds one
- You will be notified once the driver installation is complete
In case the printer is not automatically found:
- Go to Unity Dash and search for “printers“.
- Click “Add” and select the printer from the list of available devices
- Click “Forward” and wait while the system searches for drivers
- You can customize the printer’s name, description and location. When you are ready, click “Apply“
- Try printing a test page to see if the printer works fine.
25. Enable Workspaces
With Ubuntu Unity Desktop you can use more than one workspaces. Workspaces can improve your productivity….significantly! To enable workspaces in Ubuntu, open Unity Dash -> System Settings -> Apperance.
26. Install JAVA
JAVA is a programming language and many programs and websites won’t work properly unless you have it installed. To install JAVA in Ubuntu 15.10 run the following command:
$ sudo apt-get install openjdk-8-jdk
27. Install laptop tools
If you are using Ubuntu on a laptop, you can install additional tweak tools to improve your laptops battery and power consumption. These tools can improve your battery life and add some cool new features. To install laptop tools, run the following command in a terminal:
$ sudo apt-get install laptop-mode-tools
Conclusion
So there you have it folks. You just saw that even in a good operating system such as Ubuntu 15.10 there is still room from improvements. I hope you liked the article and that it helped you improve your Ubuntu desktop experience.